
Role Management with Revora Support Access
Build your own team roles. No support request needed.
Until now, giving someone different access meant choosing from a fixed set of roles, or asking support to arrange something else.
That list is now yours to write.
Create a role in Settings, choose what it can view and edit across the platform, and assign it like any built-in role. And when you want Revora’s support team inside your account, invite them for a set period. Their access ends on its own, and they never use one of your team seats.
For every team, on all plans.
Two changes, one theme: who can do what in your account.
Role Management lets you build your own roles from one permission table, with View, Edit, Delete and Special access set feature by feature. It lives in Settings → Team Settings → Role Management. Revora Support Access lets you invite a Revora support team member for a period you choose, from 24 hours to 90 days, without using a seat.
Together they let you give people the access their job needs, including seeing a feature without being able to change it.
What changes
You’ve had a fixed set of roles. If someone needed something in between, a teammate who should see your bot settings but not touch them, the answer was a message to support.
And when Revora’s support team needed to get into your account, they joined like any other member. They took a seat, got blocked when your plan was full, and stayed until someone remembered to remove them.
Neither of those is true anymore.
| Before | After |
|---|---|
| A fixed set of built-in roles, each with a set list of access. | You build your own roles by choosing which features a role can use, alongside the built-in system roles. |
| A different set of access meant contacting support. | You create, edit and delete custom roles yourself in Settings → Team Settings → Role Management. |
| No way to let someone see a feature without also being able to change it. | Each feature can be granted as View, Edit, Delete or Special, so a role can see a feature without changing it. |
| A Revora support team member took a seat, was blocked when your plan was full, and stayed until someone removed them. | Revora support joins for a set period of up to 90 days, never uses a seat, and their access ends on its own. |
Build your own roles
1. The Role Management page.
Every role in your team is listed here. Roles marked System are built-in roles managed by Revora: you can view them, not edit them. Roles without the label are custom roles your team created.
For each role, Access to shows the features it can use and Members shows how many people hold it. Hover over the + count to see the rest of a role’s features.
2. View, Edit, Delete and Special, per feature.
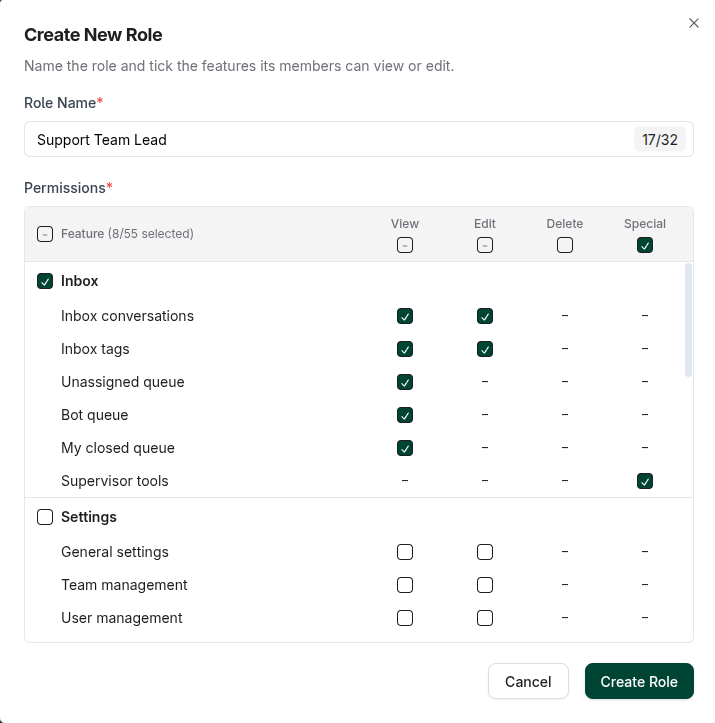
Each feature in the permission table has up to four columns.
| Column | What it allows |
|---|---|
| View | The role can see the feature. |
| Edit | The role can make changes in the feature. |
| Delete | The role can delete items. Available for Datalab only. |
| Special | Available for Supervisor tools only. Lets the role see and work on every ticket in the team, not only their own. |
Not every column applies to every feature. Where one doesn’t, the table shows a dash instead of a checkbox. Disconnect channels can only be granted as Edit, and Reports & analytics can only be granted as View.
3. One permission table for the whole platform.
| Section | Features |
|---|---|
| Inbox | Inbox conversations · Inbox tags · Unassigned queue · Bot queue · My closed queue · Supervisor tools |
| Settings | General settings · Team management · User management · Role management · Group management · Tags · AI topics · Saved replies · Ticket configuration · Business hours · SLA configuration |
| Automation | Bot builder · Workflow automation |
| Data | Datalab · Custom API · Customers & audience |
| Channels & Integrations | Channel integrations · Disconnect channels · NLP integrations · E-commerce integrations |
| Marketing & Reporting | Broadcast · Reports & analytics |
| Other | Billing · Raven |
4. Custom roles sit beside the built-in ones.
Wherever you choose a role for a team member, your custom roles appear alongside the system roles.
5. The built-in roles stay as they are.
Every team has these system roles: Admin, Developer, Marketeer, Agent, Supervisor, Datalab and Inbox Only, Agent (w/o Unassigned), Agent (All Tickets) and Reports Only. Revora sets their access and it can’t be changed, and their menu offers View only. If your team is happy with them, there is nothing to do.
Revora Support Access
When you need hands-on help, invite a support team member using their @userevora.com email, for a period you choose.
They work in your team with the role you give them. Their access ends on its own when the period is over. And they never count toward your plan’s seats, so you can invite them even when every seat on your plan is already taken.
That’s the whole job. No reminder to set, nobody to remember to remove.
| Option | What it gives you |
|---|---|
| 24 hours, 3 days, 7 days, 14 days, 30 days | A fixed period of access |
| Custom date & time | Any end date, up to 90 days away |
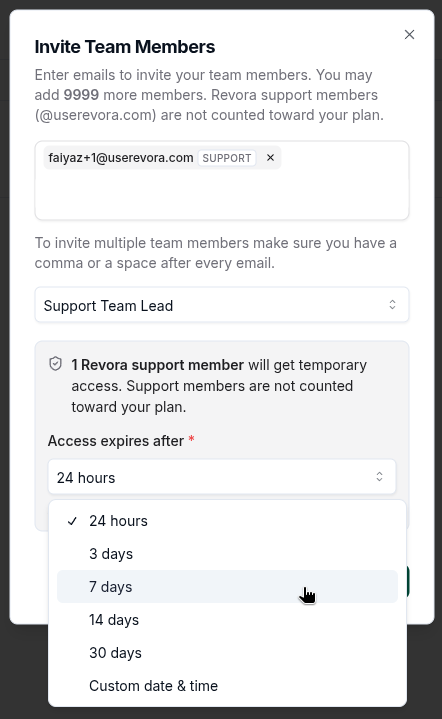
The invite window shows exactly when access will end. In User Management, the support team member is marked Revora Support, with a note showing when their access expires. When that time comes, their access stops and they are removed from your team automatically.
How to set it up
Create a role
-
Go to Settings → Team Settings → Role Management and select + Create New Role.
-
In Role Name, enter a name of up to 32 characters. It must be different from every other role in your team, including the system roles.
-
Under Permissions, tick what the role can do in the View, Edit, Delete and Special columns. You can tick a single box, a whole row, a whole section or a whole column. Hover over any checkbox to see exactly what it grants, for example “View access to Bot queue”. Select at least one permission.
-
Select Create Role. The new role appears in the list with zero members.
Assign it to a team member
-
Go to Settings → Team Settings → User Management and find the team member. You can search by name or email.
-
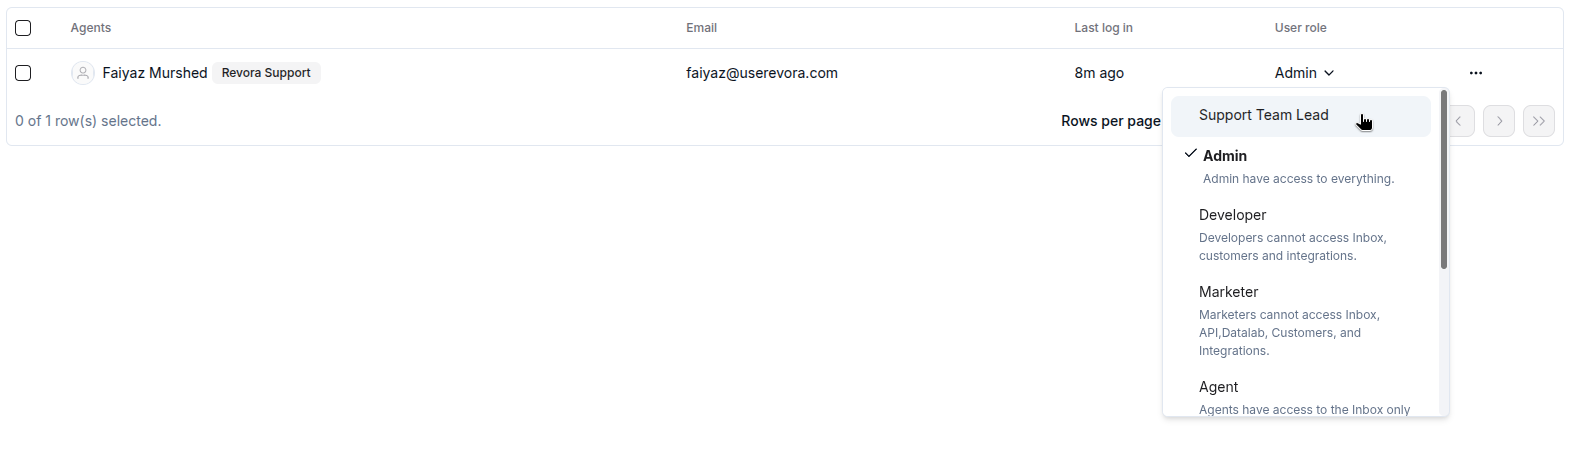
In that member’s row, open the User role dropdown and select the role.
The member now has access only to the features that role allows. You can also choose the role when you invite someone new, in the Invite Team Members window.
View, edit or delete a role
-
Go to Settings → Team Settings → Role Management and open the three-dot menu on the role.
-
Choose View, Edit Role or Delete.
A role can’t be deleted while team members or pending invitations still use it. Move them to another role first.
Give Revora support time-limited access
-
Go to Settings → Team Settings → User Management and select + Add New Member.
-
In Invite Team Members, enter the support team member’s @userevora.com email.
-
Under Access expires after, choose 24 hours, 3 days, 7 days, 14 days or 30 days, or choose Custom date & time and pick an end date up to 90 days away.
-
Choose the role they should work with, then select Invite.
Limits
-
One role per member. Each team member holds one role at a time. The team owner’s role is shown as Owner and can’t be changed.
-
Custom roles start from an empty table. There is no option to copy a system role as a starting point.
-
Menus catch up at the next sign-in. A changed role applies on the member’s very next action, and access you remove is refused straight away. What their menus and buttons show updates the next time they sign in or switch teams.
Availability
| Detail | Answer |
|---|---|
| Plans | All plans |
| Where | Settings → Team Settings → Role Management |
| Revora Support Access | Every team, on all plans. Support team members don’t use a seat. |
| Who can manage roles | Anyone whose role has View on Role management can open the page. Creating, editing and deleting roles needs Edit on Role management. |
FAQ
-
Do I have to do anything?
No. The built-in roles and their access are unchanged. Every role that could already manage users was given the same access to roles when this released. -
Where do I find it?
Settings → Team Settings → Role Management. To assign a role, go to User Management in the same place. -
Can I copy a built-in role and adjust it?
No. There is no duplicate option, so a custom role is built from an empty table. -
What happens to people if I delete a role?
Nothing, because it can’t happen. A role can’t be deleted while any member or pending invitation holds it. -
Do changes to a role apply straight away?
Yes, on the member’s next action. Their menus and buttons update the next time they sign in or switch teams. -
Which plan is this on?
Every plan. Custom roles used to be limited to higher plans and set up through support. -
Does Revora support use one of our seats?
No. Support team members never count toward your plan’s seats, even if every seat is taken.